
This may be obvious for some, but for whom it isn’t, I want to call it out and describe it as extremely useful: If you ever have to dismantle a complicated audio/video system, take pictures of the cabling before you pull it all apart.
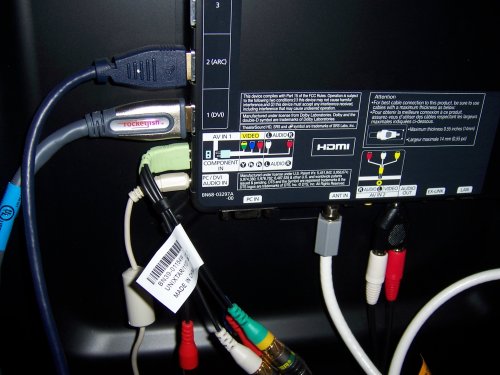
We bought a flat-screen TV and associated media components last year for the lower level, and a Geek Squad guy came out to assemble and test it for us. Now, I’m not a big media guy. I watch movies when I’m on the treadmill, and sometimes TV. I’ve spent my time learning other things. So when I had to empty out the carpeted areas of the lower level, I took one look at the ratsnest behind the electronics and dove for my digital camera. I took pictures of the cables behind the TV and each of the other components. Yesterday, when it was time to put everything back in place after a two-month hiatus (which is more than long enough to forget everything) I printed out five color copies of the pertinent photos, and had it all reratsnested and working inside of twenty minutes, with no false moves at all.
I recognize that it may be difficult to get a camera behind some systems. If you can, pivot each component out far enough to snap what’s plugged into it. If you can’t, well, maybe using longer cables would be a good idea.
Having fought with media messes like this on many occasions, I’m guessing that this technique saved me hours I would otherwise have wasted and never have again. Highly recommended.


This technique would also likely work for the connections on the back of a computer. Or inside a computer.
Of course, I do my own cabling rather than call in the Geek Squad (hint: around my place, I am the Geek Squad), so I generally know what goes where. Still, it’s getting harder; hooking my Xbox to my little TV in the computer room required plugging in no less than six RCA phono plugs. It’s using HD component video, because that Xbox is one of the old “Xenon” consoles; it doesn’t have an HDMI output like Sabrina’s newer “Valhalla” console has.
I’ve worked with personal computer hardware since before the IBM PC, and used to build my own systems from scratch. Not so media walls. That said, if I were to try and do a case transplant on my quad-core (which I’m considering, given that the vendor can’t or won’t sell me a port daughterboard) I would take macro shots of the internals before yanking everything out.
Yep he’s the ‘Geek Squad’ in our household and he can keep it lol. I probably wouldn’t have any problems, but still let him do the messing around and I’ll stay out of it and just yell at him to let him know it ain’t working ;).
I second your recommendation of this technique; I’ve used it (via my handy and ever-present iPhone camera) on numerous occasions. It’s also a godsend for documenting the disassembly of anything intricate or complex: twice in the past year, I’ve had to tear apart a big-screen DLP television in order to repair or replace parts, and without a photographic guide, I’d never have been able to get all the internal (infernal?) ribbon cables and oddball jumpers back into their correct places, oriented correctly, with no leftover danglers. (You’d think that modern modular design would make it *easier* than working on an old solid-state or tube set, but it seems the designers of this particular set didn’t think of using keyed plugs of differing sizes to make screw-ups nearly impossible.)
Using photos for existing media cabling setups saves two headaches – the one where you figure out how to get everything back into a working configuration, and the one where you tweak the settings of all your input devices. If you can get ’em plugged back in where they originally were, the settings are already there, and you’re done.
It’s also handy for finding out which ports are available, and where they’re positioned, in those too-big-to-move large-screen devices. We’ve got a large display used for videoconferencing in my office; the external switching device went down, so we needed to find out what ports were actually available (original paperwork long since lost or misfiled). Out came the SX230 for a quick and easy check.